Friday, March 30, 2012
Deviled Eggs
The final appetizer Chris and I had during the Mad Men Season 5 Premiere with our Old Fashioneds and Martinis was my mother's delicious deviled eggs! I only made six eggs since there were just two of us, but I'll post the recipe for a dozen and a half dozen below.
You first want to start by boiling your eggs. To boil eggs perfectly, fill a pot with water, add the eggs and about a tablespoon of apple cider vinegar, and then turn the burner to high. Once achieving a rolling boil, allow the eggs to boil for 2 minutes before turning the heat completely off. Leave the pan on the hot burner for 12-15 minutes. Finally, remove the eggs with a slotted spoon, and put them in a ice water bath. Once the eggs are cooled you can remove them from the ice water bath to a dry bowl. They can be kept in the refrigerator for up to 5 days. Chris and I boiled the eggs on Friday to be used on Sunday.
To begin the hard boiled eggs you want to crack and peel your eggs. I like to rinse mine off under water to make sure there are no egg shell pieces left behind.
Cut your eggs in half.
Remove the yolks to a bowl.
Assemble your other ingredients. We need miracle whip, apple cider vinegar, yellow mustard, salt and pepper for the filling. We also need paprika to garnish. (My paprika was missing in action.)
To assemble the filling for a half dozen deviled eggs add 4 tablespoons of miracle whip.
Next add 1/2 teaspoon of apple cider vinegar, 1/2 teaspoon of mustard, 1/16 of a teaspoon of salt and a dash of pepper. I just filled my 1/8 teaspoon up half-way for the 1/16. The measurements for a dozen eggs are with the full recipe below.
Break up the yolks. Mix ingredients together until completely combined and most of the lumps are gone.
Using a small spoon (I used a teaspoon) refill the egg whites with the deviled egg mixture.
Sprinkle the tops with paprika and garnish with olives if you so desire. Serve! Chris and I did not have any deviled eggs leftover. These are addictive!
Tuesday, March 27, 2012
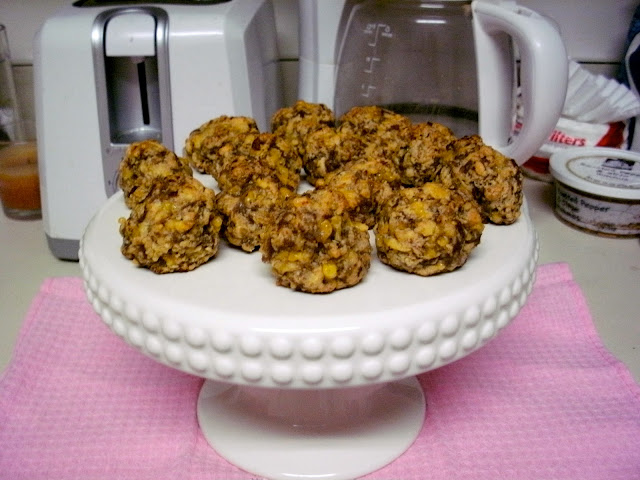
Sausage Balls
Lightened Up French Onion Dip
One of the hors d'oeuvres Chris and I will be having on Sunday is a '60s classic French Onion Dip. You could run out and buy a tub of this at the grocery store, but this version is so much better, and healthier. It takes about 40 minutes to caramelize the onions, and then you just need to stir in some Greek yogurt, refrigerate, and serve! You can make this dip ahead of time. Extra time in the fridge only makes the dip better!
Thursday, March 22, 2012
Mad Men Inspired Cocktails
DEBAUCHERY IS BACK.
"My generation, we drink because it's good,
because it feels better than unbuttoning your collar,
because we deserve it.
We drink, because it's what men do."
-Roger Sterling
Author, lover
-Roger Sterling
Author, lover
Here, Here! It has been two years too long since the end of season four of Mad Men, and I am ecstatic for the two hour season premiere of Mad Men this Sunday!! Chris and I are both Mad Men lovers and are going to celebrate the beginning of season five in true Mad Men style, with Man Men inspired cocktails and hors d'oeuvres.
The cocktails Chris and I decided to have are an old fashioned (no brainer) and a martini.
Wednesday, March 21, 2012
Reuben Sandwiches
I made Reuben sandwiches with the leftovers from my corned beef. Chris and I absolutely loved these sandwiches. We had them with leftover cabbage and potatoes on the side, but could barely eat any of the veggies because the sandwiches were so filling!! I almost hate to say it because the corned beef and cabbage was so good, but these may have been even better!
In order to make Reubens you need stone ground mustard, thousand island dressing, swiss cheese (I used reduced fat), sauerkraut, rye bread, and corned beef. The horseradish is optional, Chris and I ended up deciding against it and just going the traditional Reuben route.
Monday, March 19, 2012
Slow Cooker Corned Beef and Cabbage
In honor of St. Patrick's Day this past weekend, I thought it would be fun to make Corned Beef and Cabbage to ring in the holiday on Friday night. Preparing the roast in the slow cooker was so easy, and it was fantastic to come home Friday night to a dinner almost completely ready. I decided to make my cabbage separately, because I was worried it would become too mushy in the slow cooker after eight hours. The cabbage only took about 15-20 minutes to prepare when I returned home from work on Friday night.
Friday, March 16, 2012
Bacon and Roasted Vegetable Ragu Over Chicken and Rice
This recipe came about as many of my recipes do, figuring out how to make a delicious and satisfying dinner from what I have on hand. I knew Chris was joining me for dinner yesterday, so I checked out my refrigerator in the morning. Leftover roasted vegetables and diced fire roasted tomatoes in the fridge, two lonely chicken breasts in the freezer. I moved the chicken into the fridge to defrost, and then set out on my way to work pondering what to make. When I suggested making a "sauce" out of the roasted vegetables and tomatoes, Chris was intrigued, but not sold. Then I mentioned that I could put this sauce over chicken that had been cooked in bacon fat. Needless to say dinner was decided.
For just going with the flow, this recipe pleasantly surprised Chris and I. It was fast and simple, in addition to being delicious, and made completely from items I had in the pantry and refrigerator!
Start out by frying up some bacon on medium-medium high. I used turkey bacon, because that's what I tend to buy - a mild attempt at watching my figure.
While the bacon was cooking I also put some rice on to serve the chicken and ragu over. You can use any type of rice you want, I used a whole grain chicken flavored blend. Prepare the rice according to the package directions.
After your bacon is nice and crispy remove it from the pan to paper towels, and let it cool before cutting it into pieces. Next, turn down your burner to medium and season your chicken breasts. I seasoned my chicken breasts with dried thyme, basil, garlic powder, salt and pepper prior to cooking. Be sure to season both sides! After seasoning, add the chicken to the pan, do not pour out that bacon fat!
Thursday, March 15, 2012
Favorite Roasted Vegetables
If there is one thing you should know about me, it is that I l-o-v-e roasted vegetables. I have been known to eat an entire pan of them for dinner, and am not ashamed one bit. They are so easy and versatile, and are ready in 20-25 minutes! I try to pick vegetables that are in season, but my all-time favorite combination is zucchini, yellow squash, red peppers, green peppers, broccoli, and red onion. I sometimes substitute artichoke hearts for the broccoli when I can find a good deal on them.
Wednesday, March 14, 2012
Brown Sugar and Balsamic Glazed Pork Loin
I made this the other night for the boyfriend and I, and man was it good! I saw this recipe on Pinterest and immediately knew it was a meal Chris and I would both love. Not only was it incredibly delicious, but also so easy! I was a little worried when I was making it because I didn't read the comments on Christina's post until after I had already bought my pork loin. She used pork tenderloin in her recipe, and some readers who used regular pork loin said theirs' had come out too dry, or had to be sliced instead of falling apart. I also knew I was going to be cooking my meat for much longer than the recommended 6-8 hours because I was meeting Chris downtown at Bayou for an appetizer before coming home and having dinner, which did not help my "dried out pork" concerns. However, this recipe could not have been more wonderful. The meat was falling apart just how I wanted and was incredibly moist. I think the pork loin was perfect for the amount of time mine needed to cook. If you want to make this meal in a shorter amount of time, then I would recommend going with the pork tenderloin instead, and only using half of amount of water indicated below.
Tuesday, March 13, 2012
Homemade Whole Wheat Italian Breadcrumbs
I came up for this breadcrumb recipe, when I saw that I had some bread nearing the end of its life in my pantry. I had set out to make Chicken Parmesan, and was originally planning on just grilling the chicken. However, when I eyed the bread leftover from a French Toast experiment, I decided to put my new Cuisinart food processor to the test. It did not disappoint! Making my own breadcrumbs was incredibly easy, and I will continue to make them myself instead of buying them at the store in the future. If you don't own a food processor these can also be made in a blender, or just throw everything into a big zip-lock bag and roll over it with a rolling pin until you have your desired consistency!
I only ended up using half of the breadcrumbs in this recipe for my Chicken Parmesan. The leftovers can be stored in a zip-lock bag in the freezer until you're ready to use them again!
Thursday, March 8, 2012
Lightened Up Chicken Parmesan
I have a tendency to walk into the kitchen with an idea for a meal, look in my refrigerator and pantry and then just go with the flow. That's exactly what happened with this Lightened Up Chicken Parmesan recipe. I originally thought I'd just grill the chicken, but then I saw that I had some bread which was nearing the end of its life, so I decided to try my hand at homemade Italian bread crumbs. I was also planning on serving this with a very small portion of pasta, only one cup for two servings, but my lovely (hungry) boyfriend quickly informed me that was definitely not enough pasta. So instead of a side salad we tripled the amount of pasta. Healthy.
The best part about this meal is that you can prepare the chicken and sauce all in the same skillet, making for an easier clean-up. This is a very simple week night meal and is ready in 30-45 minutes!
Subscribe to:
Posts (Atom)